How to Identify Gold Ore in the Field
A practical field guide to recognizing real gold ore and avoiding common lookalikes.
If you’ve ever wondered how to recognize gold ore in the wild, you’re not alone, and the team at Garrett is here to help. Modern gold prospecting is more accessible than it was during the old gold rush, but successfully identifying gold-bearing rock still takes knowledge, the right tools, and a trained eye.
Gold ore identification isn’t just about chasing something shiny. It’s about reading the landscape, recognizing the right rock types, and understanding the physical characteristics that point to precious metals. Whether you’re exploring new placer deposits, checking old gold mines, or walking through a known mining hotspot, knowing how to read the rocks can lead you to valuable precious metals.
Key Takeaways
Role of Metal Detectors and Fieldwork
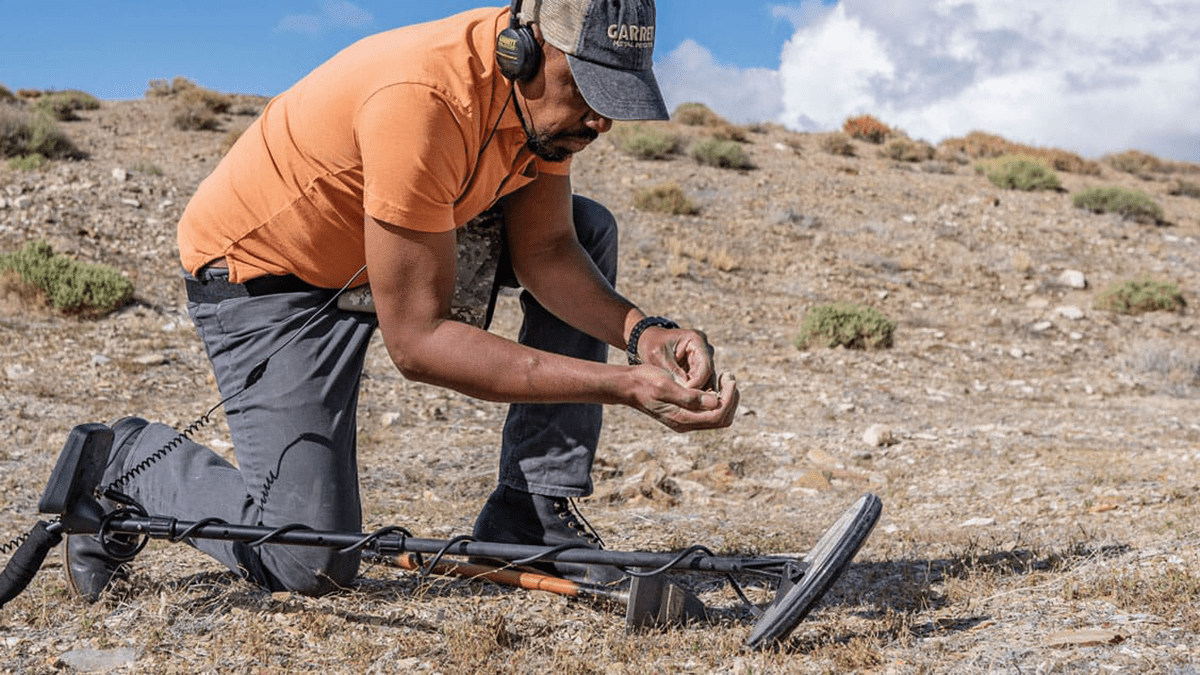
Using a metal detector is one of the fastest ways to locate gold-bearing ore beneath the surface. Advanced models can help detect high-density native gold, even in host rock or buried in placer gold deposits. But once your detector signals, fieldwork is where the real discovery begins.
Digging into the signal zone gives you the chance to observe surrounding rocks, especially quartz veins, sulfide minerals, and iron oxides, all of which are geological indicators of gold deposits. Bringing a hand lens or magnifying glass helps you closely inspect small gold particles or hints of natural raw gold embedded in the rock.
Importance of Distinguishing Real Gold from Lookalikes
Learning how to identify gold in ore samples means knowing what gold is not. Many ore rocks and other minerals share its color but not its weight, shape, or behavior. Fool’s gold (pyrite) and other sulfides might look convincing, especially under bright light, but they break, flake, or give a greenish black streak on a streak plate, unlike real gold, which leaves a yellow streak and stays intact.
If you’re serious about identifying gold ore, it’s worth practicing field comparisons. Understanding physical properties like malleability, specific gravity, and surface luster helps you avoid being tricked by similar minerals and makes ore identification more reliable.
Visual Indicators of Gold in the Field
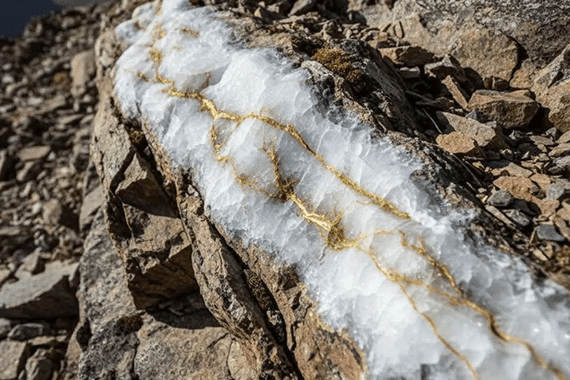
Quartz Veins as Gold’s Common Host
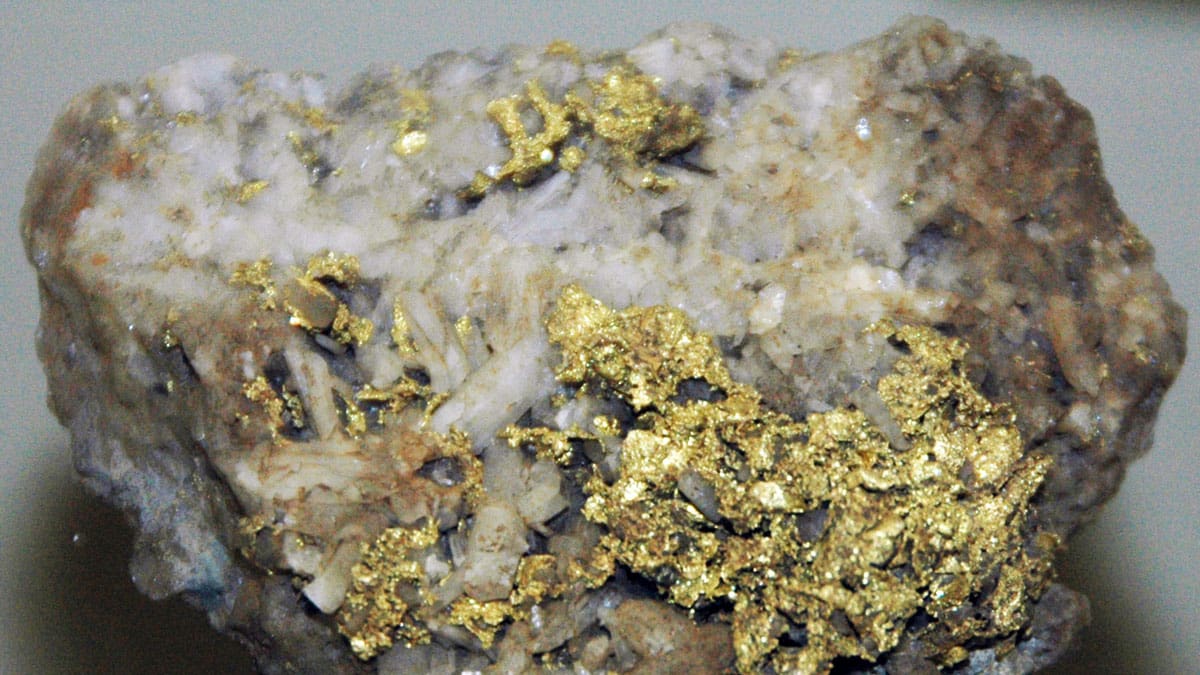
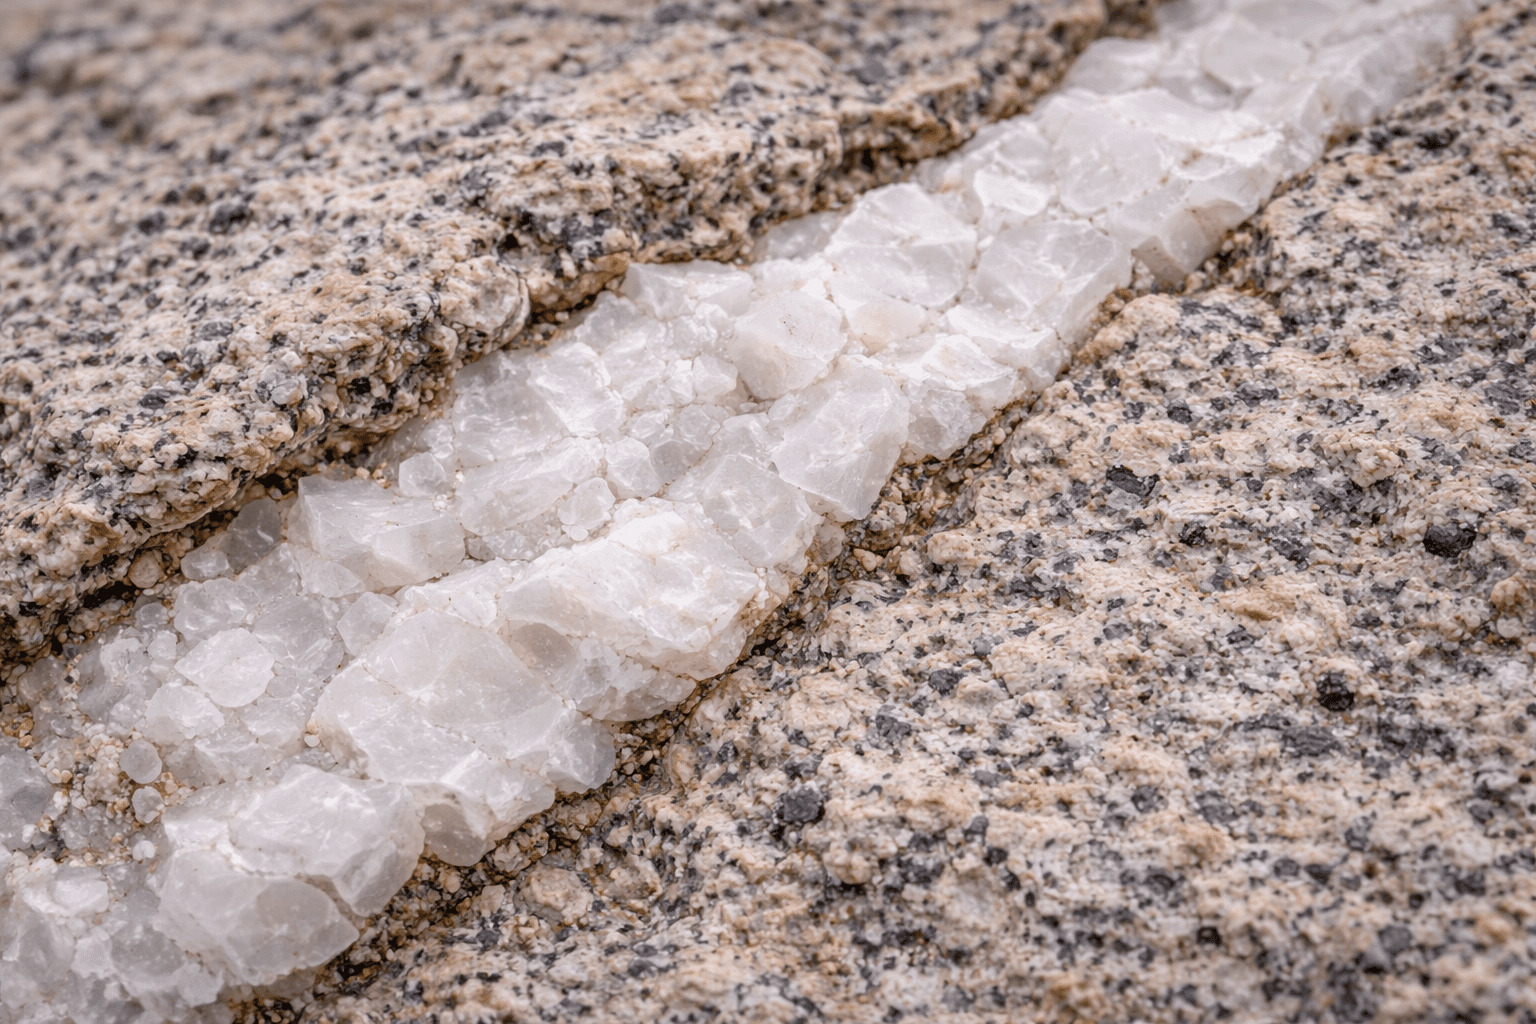
Quartz veins are one of the most common places to find gold-bearing rock. These often white, milky, or glassy structures serve as the main host rock for gold deposits, especially in areas with tectonic activity. Over time, superheated fluids rich in precious metals like gold and silver rise through fractures in the earth’s crust, leaving behind free gold and gold particles as they cool.
Keep an eye out for rotten quartz, a weathered form that can crumble under pressure, which may indicate that high grade gold ore once moved through it. These zones can also contain native copper, lead oxide, or rare earth minerals, all signs of mining history and geological indicators worth exploring.
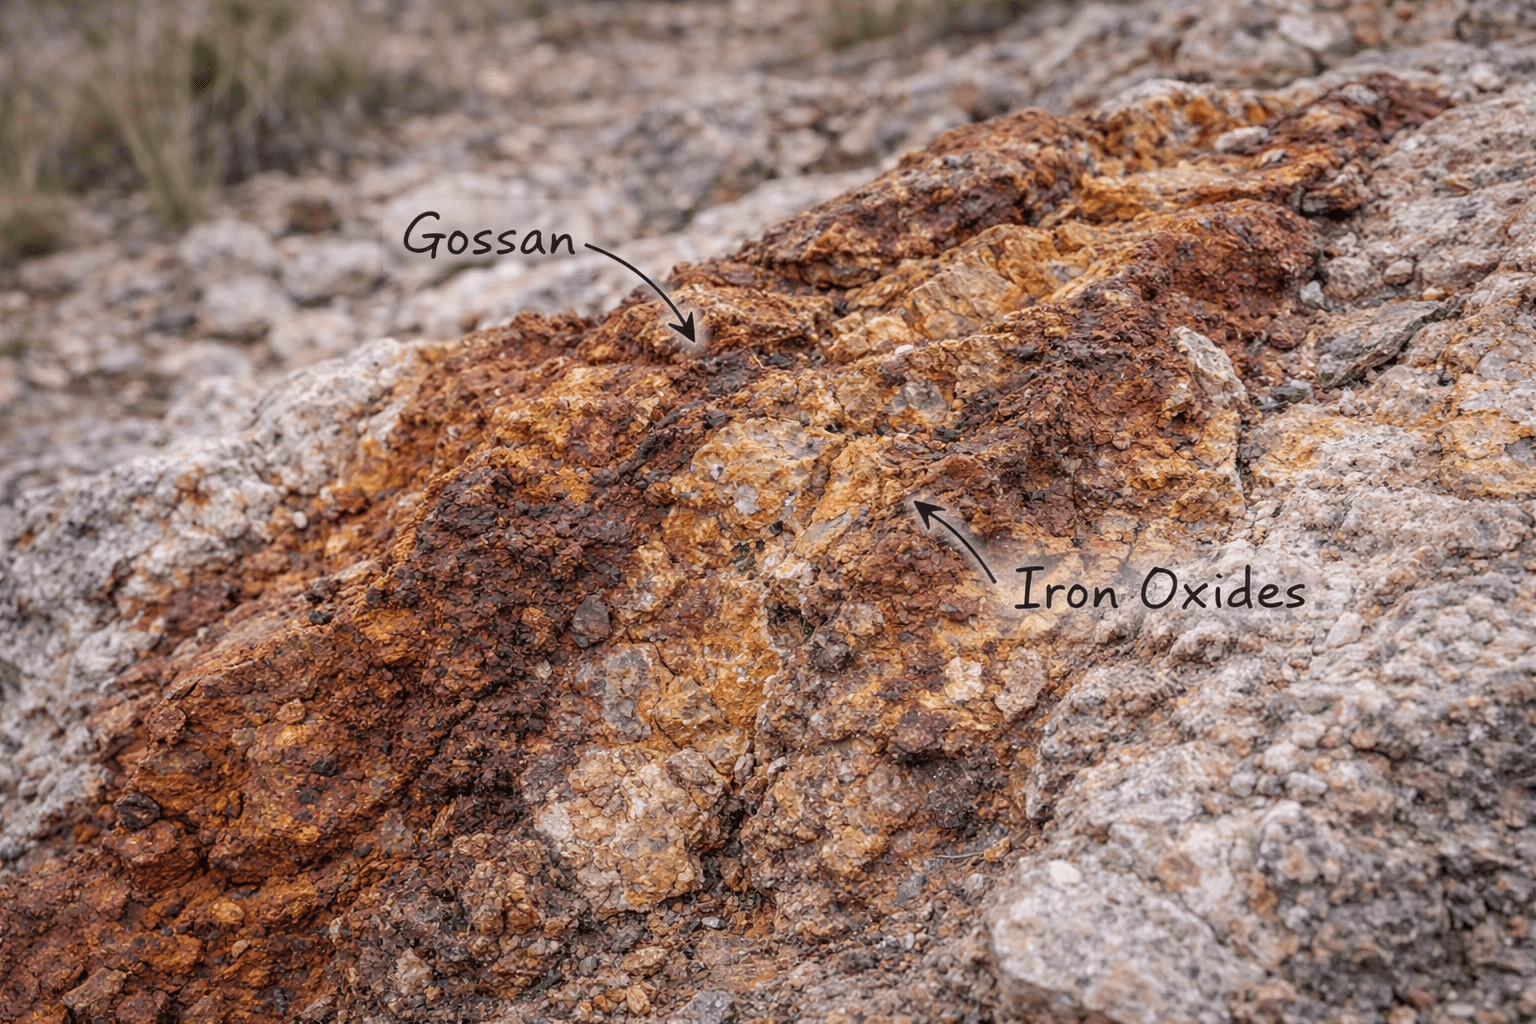
Iron Staining and Gossans
Iron oxides like hematite and limonite create striking red, brown, yellow, or purple stains on rock surfaces. These stains are clues that oxidized sulfide minerals, often rich in gold content, are nearby. These areas, called gossans, mark where sulfide minerals have weathered and leached upward, sometimes revealing moderate grades or even high grade ore.
Look for gossans on ridges, hillsides, or cuts, anywhere that erosion has peeled back the top layer and revealed the underlying ore rocks. Their presence, especially alongside quartz veins and placer deposits, is a strong signal that the area may contain gold.
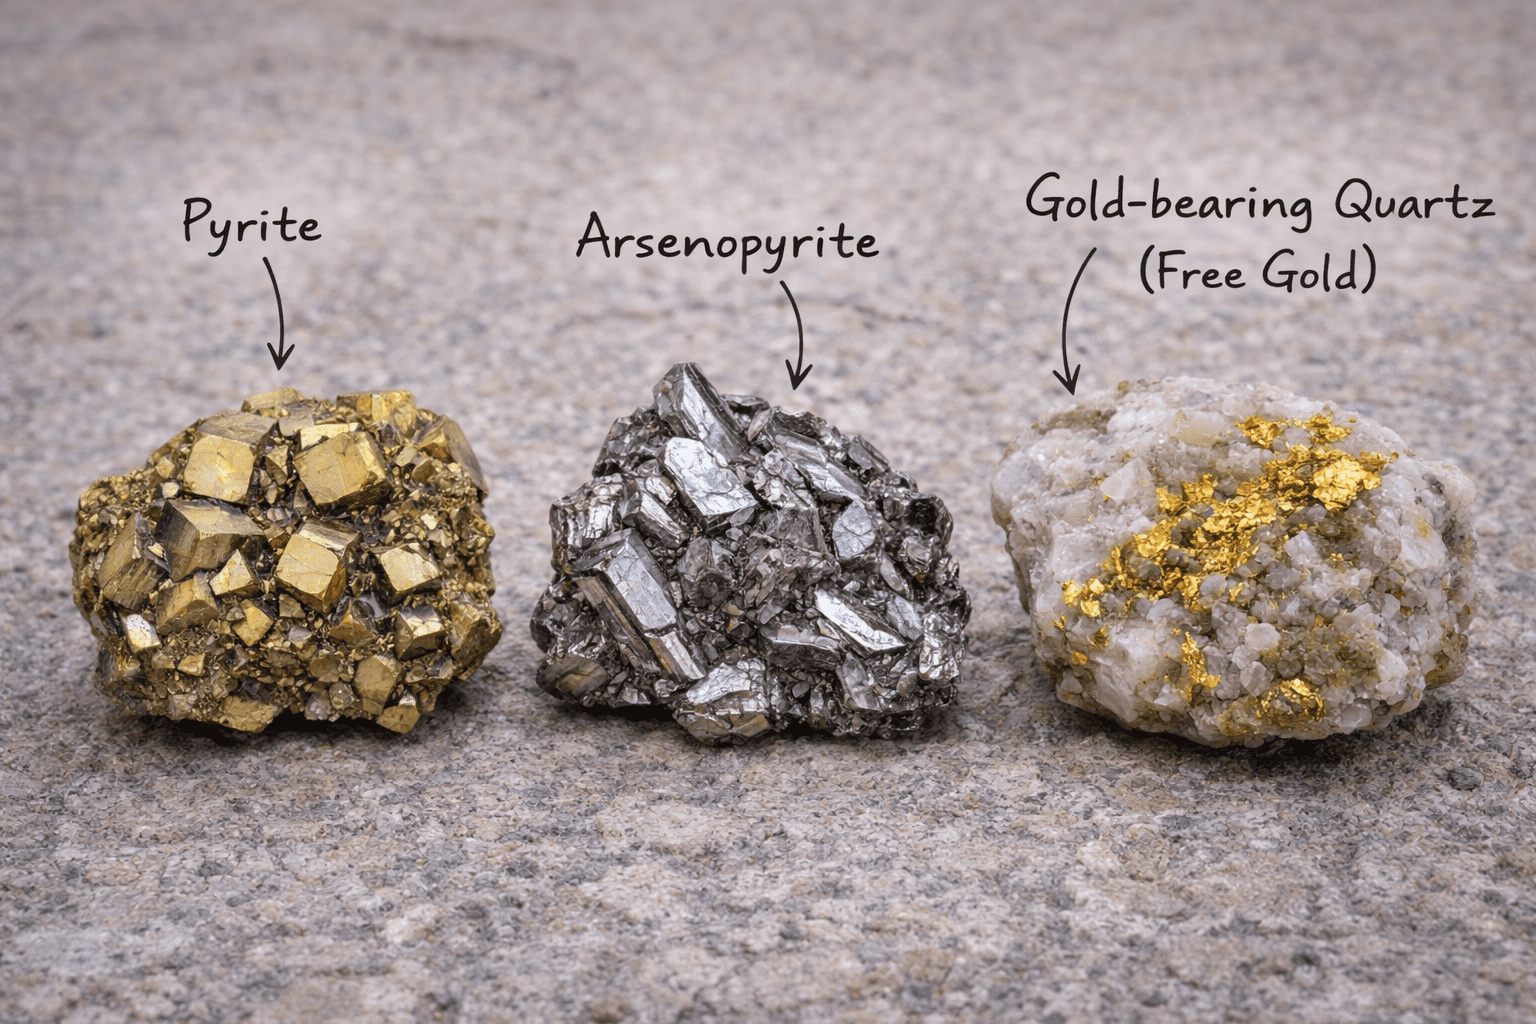
Presence of Sulfide Minerals
Sulfide minerals such as pyrite and arsenopyrite are often found near or even enclosing gold particles. In hard rock mining, these minerals can host invisible gold, where gold content is microscopic and not seen with the naked eye.
Pyrite appears shiny and cubic, while arsenopyrite has a duller silver tone with a striated or bladed shape. These are critical in gold ore identification because they often cluster near high grade veins. Pay close attention to texture, color, and how these minerals interact with surrounding quartz or host rock.
Physical Characteristics of Gold Ore
Metallic Luster and Surface Shine
Real gold has a soft, metallic luster that doesn’t sparkle, it glows. This is one of the easiest visual clues to spot, even for beginner prospectors. In bright sun or under a flashlight, pure gold gives off a consistent sheen, while similar minerals like mica, chalcopyrite, or fool’s gold tend to glitter or flash irregularly.
If you’re trying to identify gold, use both natural light and tools like a magnifying glass to study shine and reflectivity. Remember, visible gold doesn’t flake or crumble when rubbed.
Density and Heft
One of the most noticeable physical characteristics of gold ore is its weight. Gold is heavy. It has a specific gravity of around 19.3, meaning it’s much denser than most other rocks. This is why a small chunk of raw gold or a gold-bearing quartz rock may feel unusually heavy in your hand.
Try a side-by-side comparison with another rock of similar size. The one with gold concentration will be significantly heavier. This simple test, often done with placer gold or natural raw gold, helps eliminate false leads.
Malleability vs. Brittleness
Gold is soft and bendable. That’s one of the easiest ways to distinguish it from other sulfides or rare earth minerals that tend to shatter under pressure. If you tap suspected material with a rock hammer, native gold will flatten or dent, while fool’s gold will break into fragments.
This “tap test” is a field version of what a professional prospector might do before sending material for a fire assay or accurate assay. In the lab, the fire assay method uses aqua regia, nitric acid, and chemical reactions to measure actual gold content, but in the field, your hammer does the job.
Basic Field Tests for Gold Detection
Basic field tests are often the first step in learning how to recognize gold ore. These tests can be done on site with minimal tools and help rule out common lookalike minerals before you invest more time or effort.
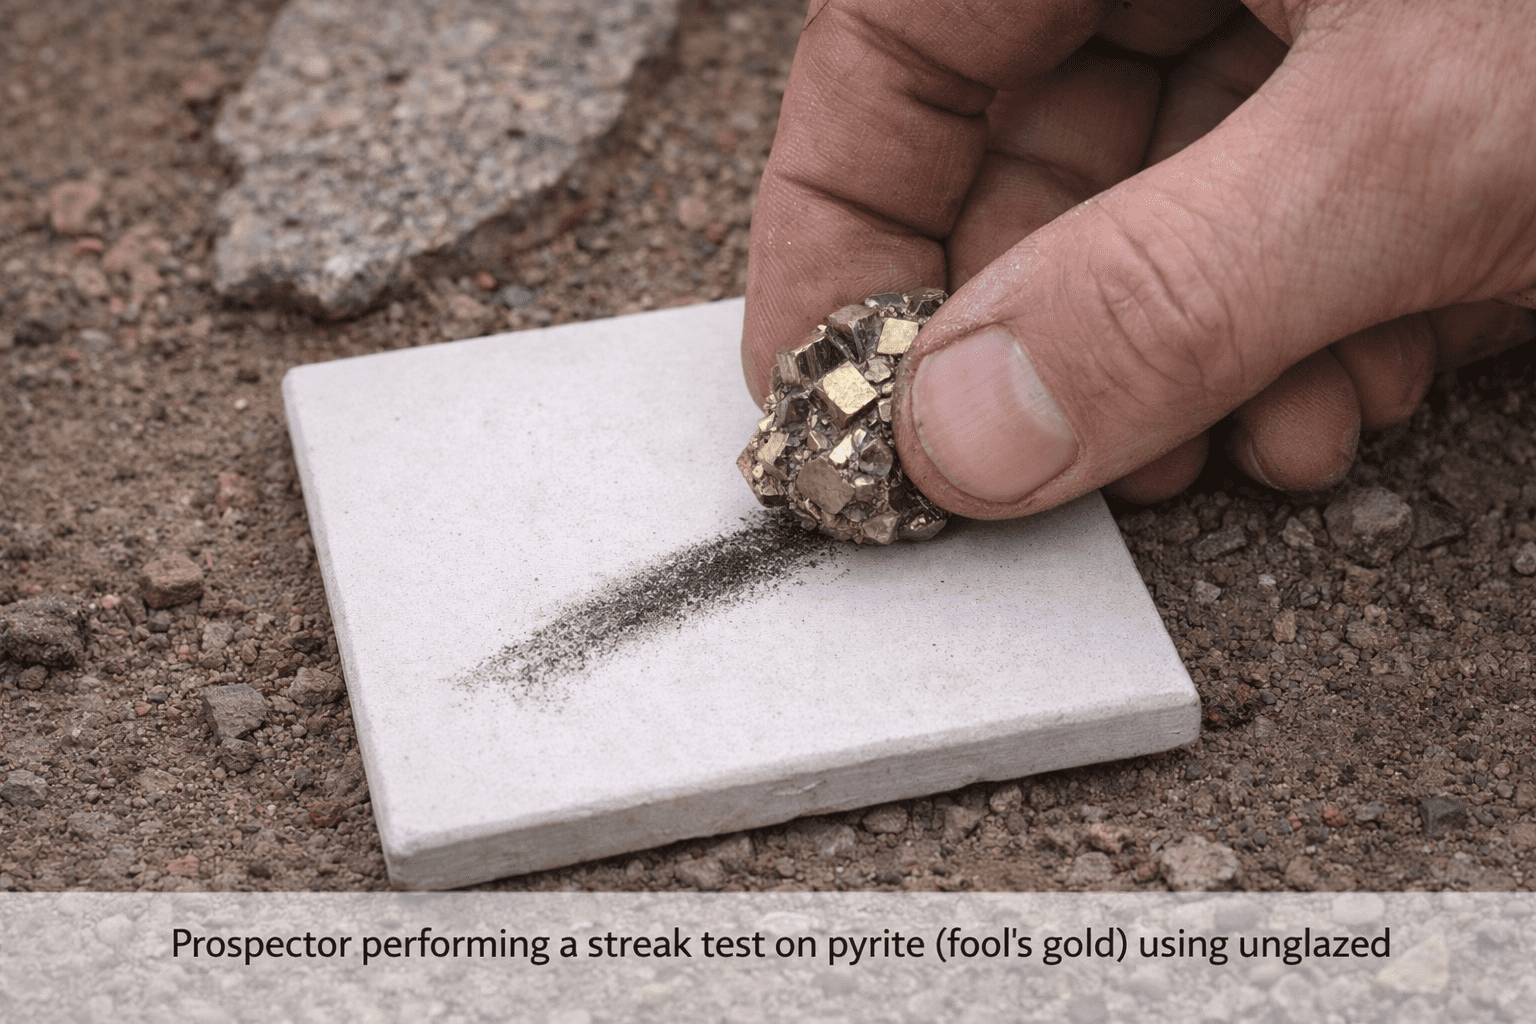
Streak Test with Porcelain
The streak test is one of the most reliable ways to separate real gold from minerals that only look valuable. It focuses on the color of the powdered material rather than the surface appearance of the rock, helping with ore identification in the field.
Use an unglazed porcelain tile or a streak plate. Press the rock firmly against the surface and drag it across with steady pressure. Check the color left behind on the porcelain rather than the ore rock itself.
Gold produces a faint yellow streak that stays consistent. Pyrite and other sulfide minerals like chalcopyrite often leave a greenish black streak. Even shiny fool’s gold will fail this test once powdered. The yellow streak is a key physical property when trying to identify gold.
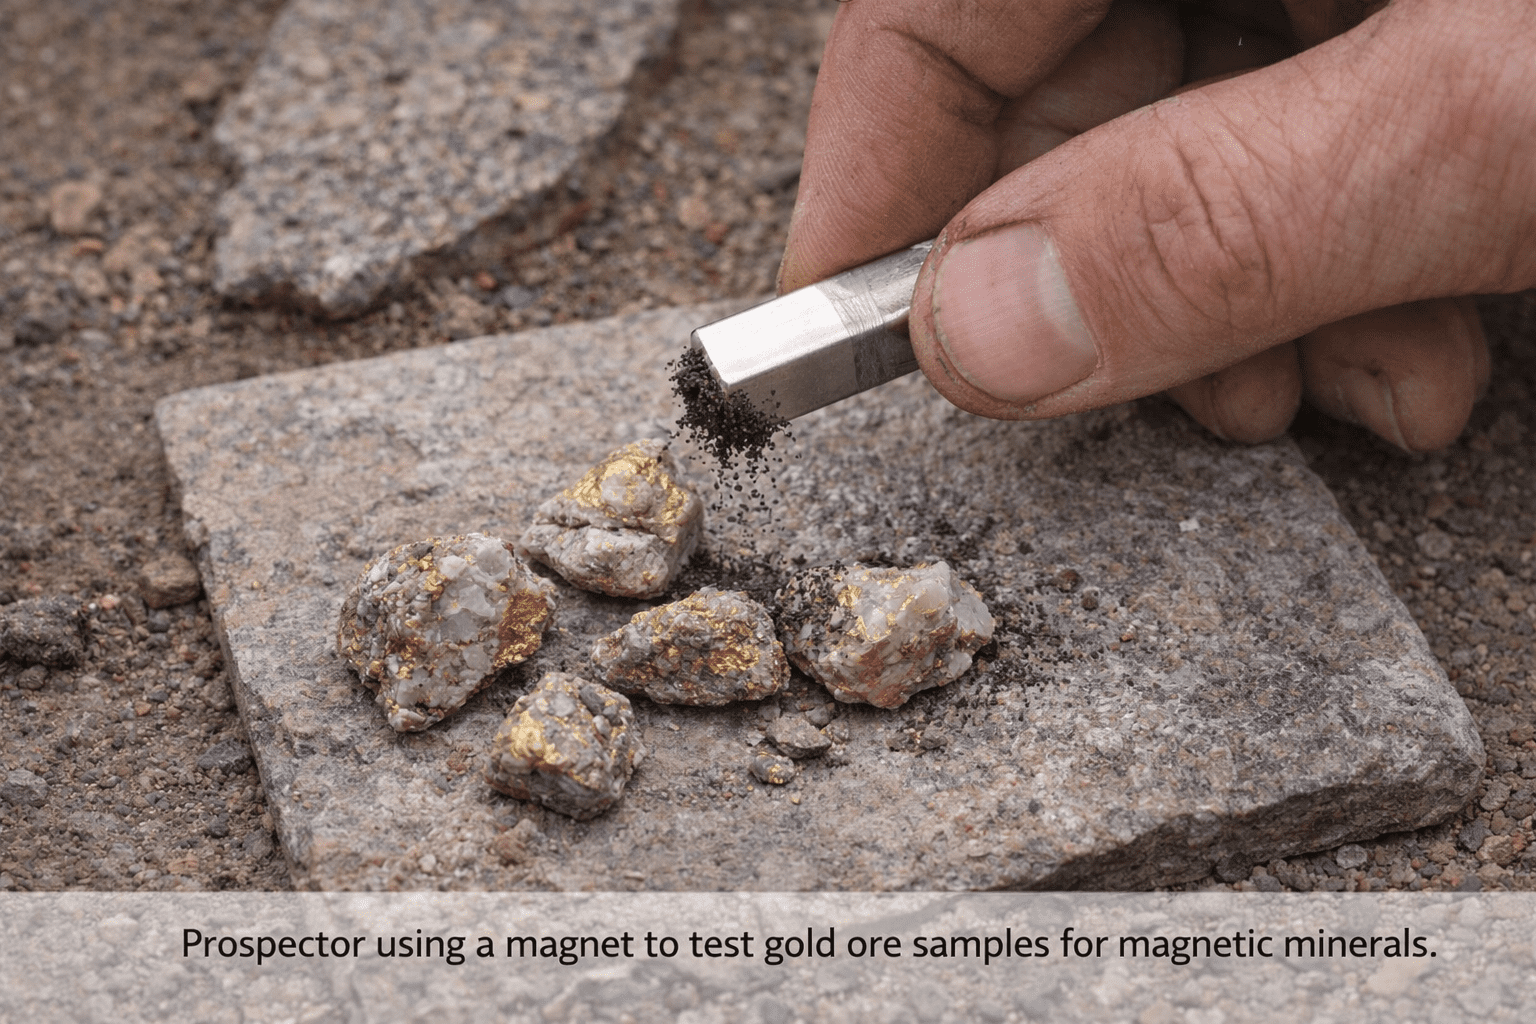
Magnet Test for Metal Differentiation
Many minerals mistaken for gold contain iron oxides or other magnetic compounds, which makes them respond to magnets. Gold does not respond to magnets, making this test quick and useful in the field, especially for identifying native gold within host rock or ore containing similar minerals.
Hold a strong magnet close to the rock or crushed material. Watch for movement or attraction, especially in fine particles. This is especially important for identifying minerals that might resemble gold particles.
If there is no magnetic response, iron-heavy minerals like magnetite can be ruled out. While this does not confirm gold on its own, it removes several common false positives in the search for natural raw gold or native gold within ore.
Water Test for Density Confirmation
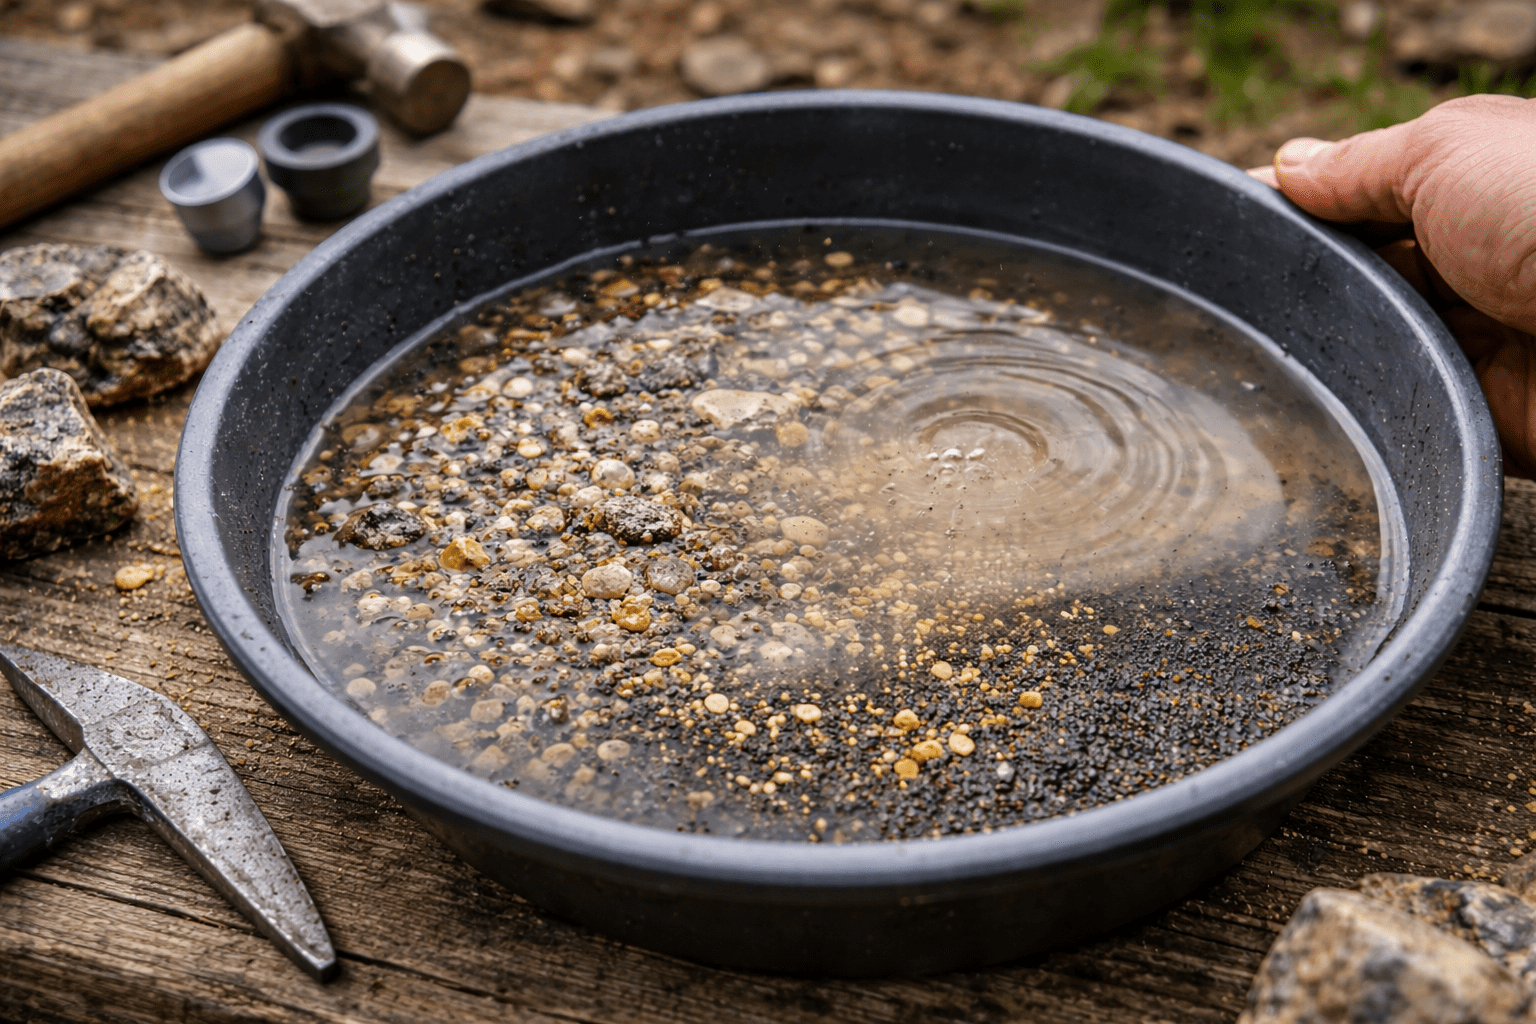
Gold is extremely dense compared to most surrounding minerals. This difference becomes obvious when samples are placed in water, and the technique is a simplified version of a specific gravity test.
Crush a small portion of the rock into sand-sized pieces. Gently drop the material into a container of water and observe how it behaves. In high grade gold ore, free gold flakes will settle quickly.
Gold sinks immediately and settles quickly at the bottom. Lighter minerals drift, swirl, or remain suspended longer. Material that drops straight down and stays put may contain gold and should be examined under magnification.
Heat Test in Controlled Settings
Gold is chemically stable and reacts differently to heat than most other metallic minerals. This test is especially helpful when identifying gold ore in hard rock environments.
When heated, pure gold does not spark, smoke, or crack. It maintains its structure until it reaches melting point, unlike similar minerals that may contain lead oxide or other reactive metals.
Gold does not oxidize and resists most acids, making it ideal for controlled tests. Minerals like pyrite may darken, flake, or emit odors under heat. A sample that remains unchanged after heating is a strong candidate for native gold and may warrant further testing using nitric acid, aqua regia, or even a fire assay method for accurate assay results.
Advanced Gold Identification Techniques

Once basic field tests suggest a promising sample, more advanced methods can help confirm whether gold is truly present. These methods are often used by a professional prospector or serious hobbyist trying to identify high grade or large quantities of gold-bearing ore.
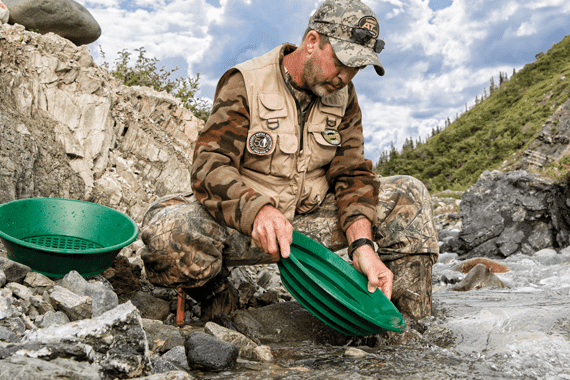
Panning Crushed Rock Samples
Panning is not limited to river gravel. Crushed hard rock can also be processed to reveal fine gold and support ore identification in remote or mountainous mining hotspots.
Crush the rock into small particles and place it in a gold pan with water. Gently agitate the pan to wash away lighter material while allowing heavy materials like placer gold to settle. Use of a magnifying glass or hand lens is often helpful at this stage.
Gold appears as bright yellow flakes or specks that stay at the bottom of the pan. Unlike mica, gold does not float or wash away when the pan is tilted. Visible gold that behaves this way is often classified as free gold and is typical in high grade gold ore or placer deposits.
Cutting Rock to Reveal Internal Flakes
Gold often exists inside quartz veins or fractures that are not visible on the surface. This method is useful when quartz-rich host rock shows no signs of surface gold, but still may contain native gold or precious metals internally.
Cutting the rock open allows you to inspect internal structures where gold may be trapped. This is especially useful for gold bearing rock identification in hard rock formations near tectonic activity or areas with existing open pit mining operations.
Weathering and oxidation can hide gold-bearing zones. A plain-looking rock on the outside can contain visible gold internally. Rocks that seem ordinary may hold rich mineralization underneath the surface, requiring cutting and magnification to identify gold ore accurately.
Using Magnification and Microscopes
Some gold is too fine to see without magnification, especially in complex ore rocks that contain invisible gold or micro gold particles dispersed within the crystalline structure.
A ten power or twenty power loupe can reveal small gold particles embedded in quartz or host rock. Portable microscopes provide even greater detail. These tools are essential in identifying gold ore where the gold content is not obvious to the naked eye.
Gold appears as irregular flakes, rounded particles, or thin wire-like shapes. Unlike crystal minerals or native copper, gold does not form sharp geometric patterns. This is often how invisible gold appears, trapped inside other minerals but detectable under a microscope.
Common Mistakes and Misidentification
Misidentification is common because many rocks and minerals share visual similarities with gold. Knowing what gold is not is just as important as knowing what it is.
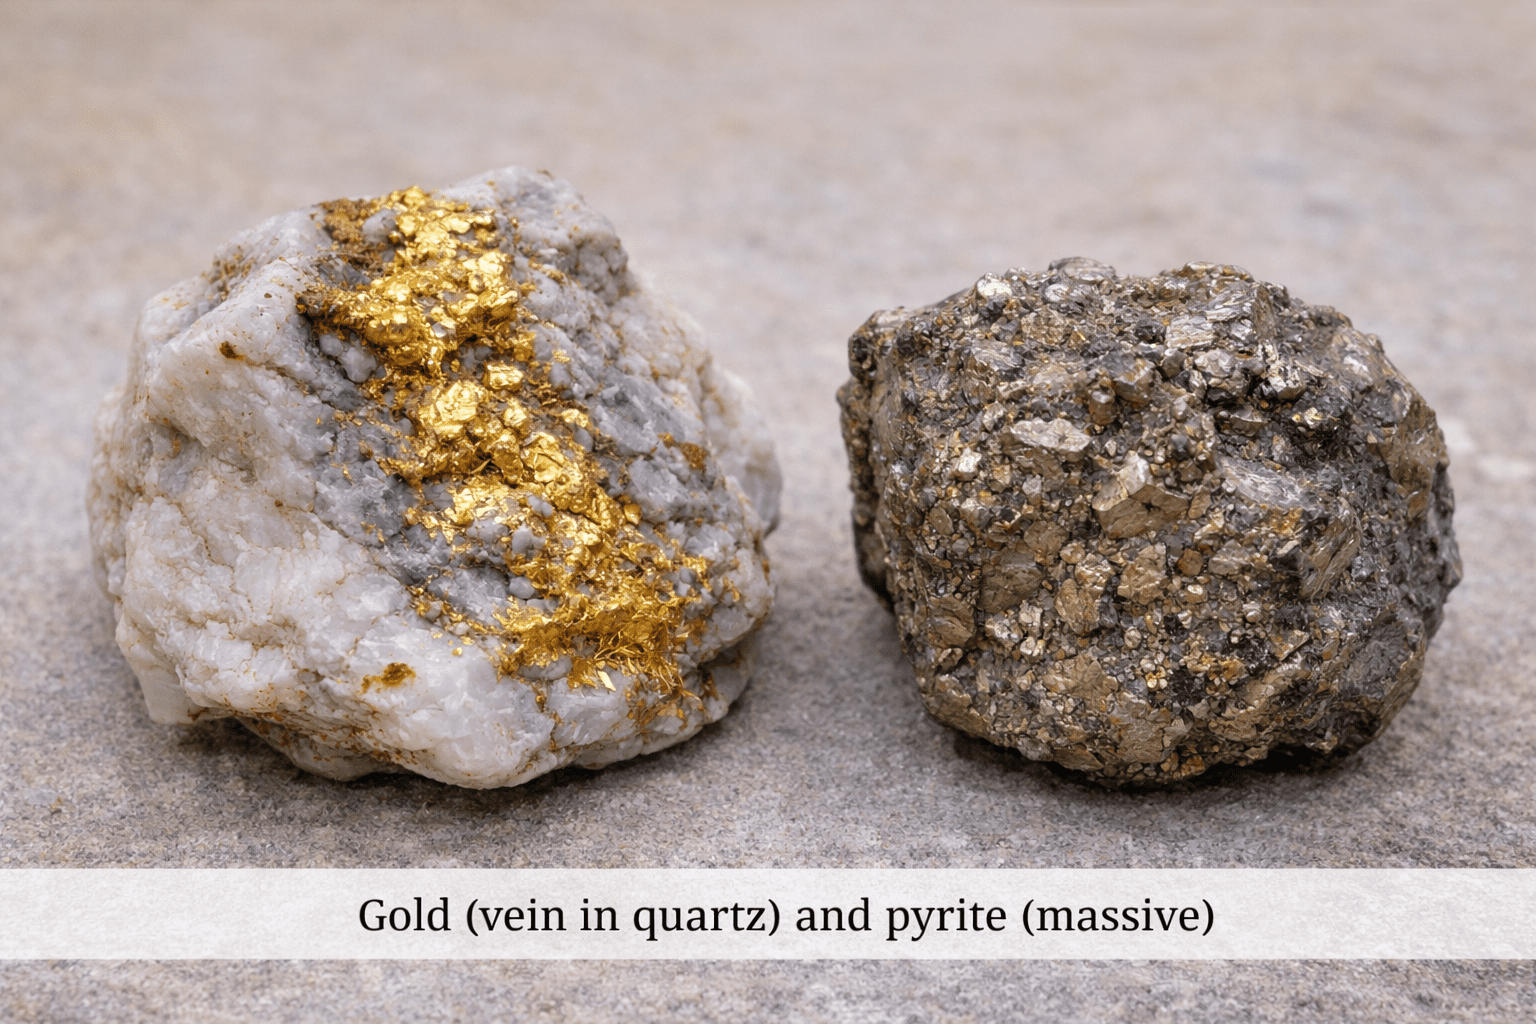
Pyrite and Fool’s Gold
Fool’s gold, or pyrite, is the most common misidentification in ore identification. Pyrite forms sharp cubes and clusters with a rigid crystalline structure. Gold lacks this geometry and instead appears rounded or irregular. Pyrite reflects light harshly, while gold has a warm tone that remains consistent under different lighting.
Gold bends and flattens. Pyrite breaks. When tested on a streak plate or unglazed porcelain, gold leaves a yellow streak, while pyrite leaves a greenish black streak. This streak test is one of the most reliable ways to separate gold from similar minerals.
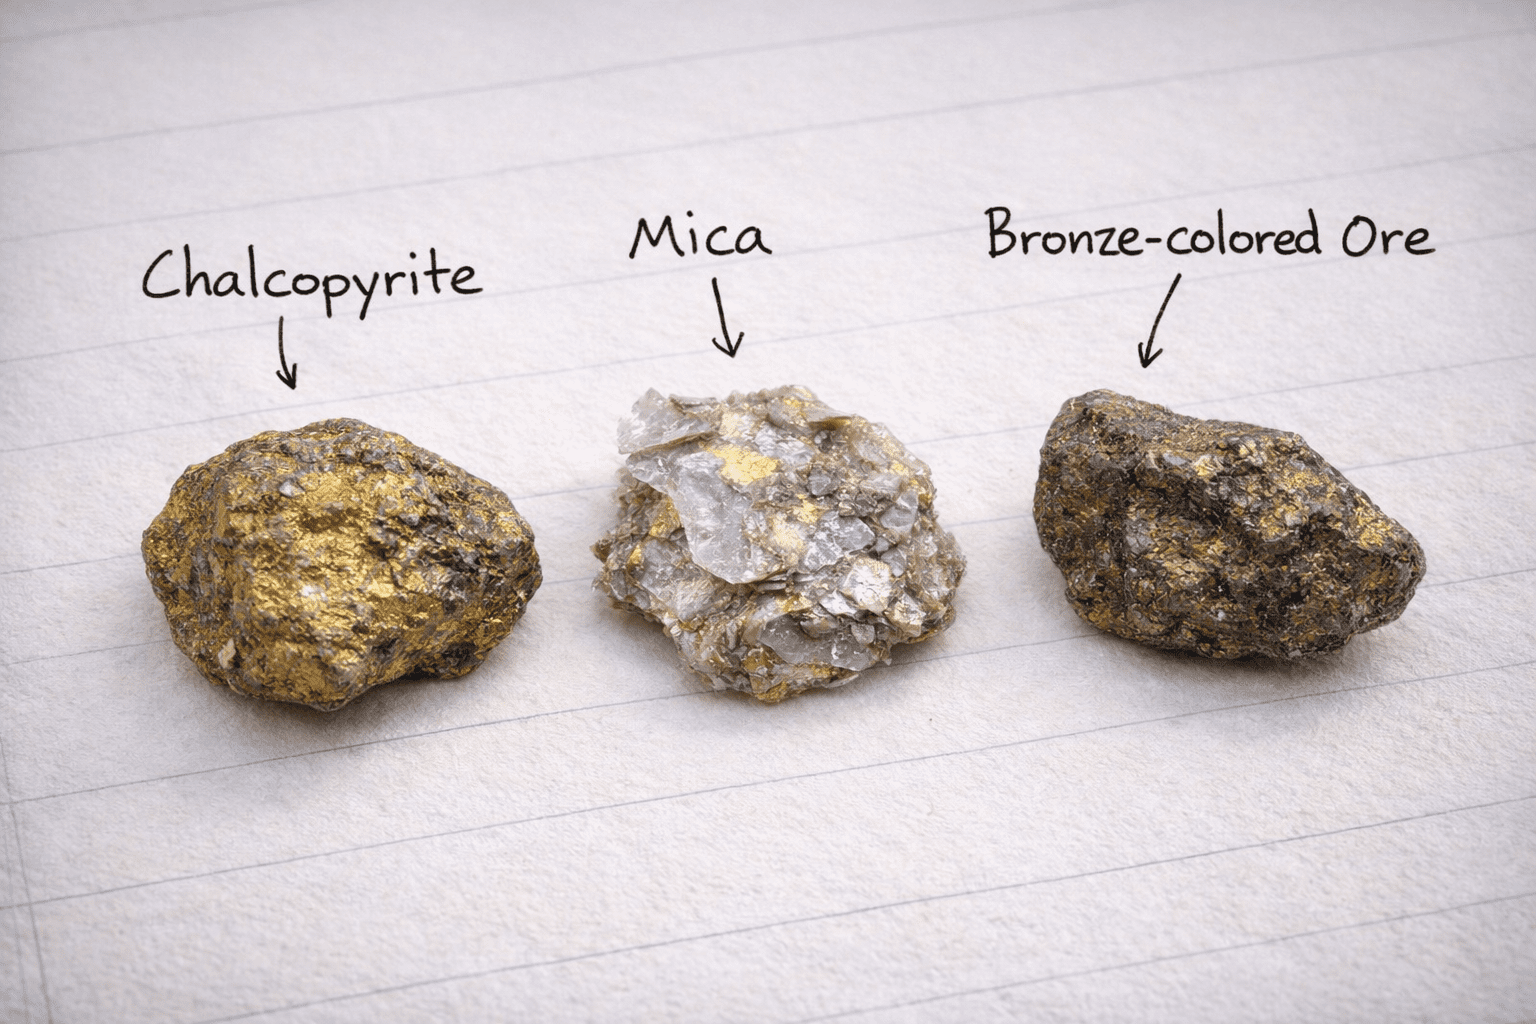
Chalcopyrite, Mica, and Bronze-Colored Ores
Chalcopyrite, mica, and bronze-colored ores often resemble gold but are easy to rule out with closer inspection. Chalcopyrite has a brassy shine but tarnishes and breaks under pressure. Mica is lightweight, flakes easily, and reflects light in flat sheets. Bronze-colored ores may appear metallic but lack gold’s weight and softness. None leave a yellow streak or pass a specific gravity test.
How Garrett Detectors Help You Identify Real Gold in the Field
At Garrett, we design prospecting detectors with one goal in mind: helping prospectors like you find more gold in more places. Whether you’re searching for small flakes near the surface or larger nuggets buried deep, our detectors are built to handle tough ground and deliver precise results, so you can spend less time guessing and more time recovering real gold.

Axiom™
This pulse induction metal detector uses advanced pulse timings to deliver maximum sensitivity, helping treasure hunters locate gold pieces and small metal objects in the toughest soil conditions, including heavily mineralized ground and salt water environments. Choose from four detection modes, each engineered for different gold hunting scenarios, whether you’re chasing down large nuggets or detecting sub-gram pickers.

Axiom™ Lite
The full features and power of Garrett’s Axiom pulse induction gold detector, in a more affordable option to get you started prospecting. Advanced pulse timings provide enhanced sensitivity and complete versatility in the most extreme mineralized soils and in saltwater. Choose from four settings, each ideally engineered for finding all types of gold, from larger nuggets to sub-gram pickers.

Goldmaster™ 24k
The Goldmaster 24k is our high-frequency VLF detector, designed for finding fine gold others miss. Running at 48 kHz with XGB ground balance, it offers stability in mineralized soil and high sensitivity to small flakes and shallow targets. It’s reliable, responsive, and built to perform where gold likes to hide.
Recap: How To Identify Gold Ore When Prospecting
Learning how to recognize gold ore takes time, repetition, and experience. Start with visual cues, confirm with physical tests, and verify with lab analysis when needed. Every sample you examine sharpens your skills and brings you closer to understanding what real gold looks like in the wild.
Watch for key geological indicators like quartz veins, changes in rock types, and mineral signs such as iron oxides or sulfide minerals. Trust your observations, but always double-check with proven testing methods to avoid being fooled by similar-looking materials.At Garrett, we’re passionate about supporting gold prospectors. We carry a full range of gold detectors suited for both beginners and experienced users, and our team is here to guide you through the selection process. If you’re not sure which detector is right for your prospecting needs, feel free to contact us – we’re happy to help.
- Quartz veins and changes in host rock.
- Iron staining and gossans on ridges and cuts.
- Sulfide minerals like pyrite and arsenopyrite.
- Soft metallic glow instead of glittery flashes.
- Heavy heft, non-magnetic response, and yellow streak.
- Malleable flakes that flatten instead of shatter.
- Fine gold that settles quickly when panned.